Adding a Module
This is a walkthrough, not a checklist. You will build a complete working module called demoD — one voltage output that reuses the existing channel UI, plus a trim slider that has no existing building block — and by the end you will have touched every layer: the state model, the hardware controller, the commands, the mirrored frontend state, two Svelte components, and a test.
demoD is real code that lives in this repository. Everything below is copied from files you can open, run, and break. It is not real hardware: the module only appears in the “Add a module” dropdown when dev_mode is on, and its hardware commands are ordinary DAC4D commands sent to whatever the rack address points at.
Read Architecture first if you have not. This guide assumes you know that the backend owns one authoritative state tree and that clients mirror it.
The mental model, if you come from Python
The frontend classes are the part that reads as gibberish to a backend developer, so start here. The single most useful idea:
A frontend module class is not a model. It is a view of a path in the server’s state document, and its job is to apply patches to reactive variables.
The backend owns SystemState. When a command mutates it, lab-link sends a JSON Patch like replace /data/5/trim_voltage -0.35. Any client holding a view of /data/5 applies that operation to a local variable, and the UI redraws. Nothing in the browser decides what is true.
| In the backend (Python) | In the frontend (TypeScript) |
|---|---|
DemoDState — a Pydantic model, the truth | class demoD extends SvelteSyncNode — a mirror of one slot |
module.trim_voltage = 0.4 mutates the truth | this.trim_voltage = 0.4 only moves the local view |
@sync.command handler — the only writer | requestDemodTrim(...) — asks the backend to write |
| Pydantic validation rejects bad input | validateRemote guards against bad incoming data |
ptr("data", 5, "trim_voltage") builds a path | joinJsonPointer("", "data", "5", "trim_voltage") builds the same path |
Two Svelte 5 details you need and no more:
let x = $state(0)declares a reactive variable. Assigning to it re-renders whatever reads it. Think “attribute with an observer attached”.let y = $derived(x * 2)declares a value recomputed whenever its inputs change, like a@propertythat also notifies.
Which end to start from, and how to run while you work
Backend first. The frontend cannot render a module type the backend cannot create — slots come from the server’s snapshot, so until initialize_module can produce a demoD, there is nothing for a component to draw.
Keep one dev server running for the entire tutorial:
DBAY_PERSIST_DB=/tmp/dbay_demo.db ./software/gui/dev-browser.shYou do not need to restart it, and you should not use build.sh while developing — that is for packaging. Both halves reload on save:
- uvicorn watches
backend/and restarts on Python edits - Vite hot-reloads Svelte edits without losing your place
The DBAY_PERSIST_DB override sends this session’s rack state to a scratch database, so a half-finished tutorial module does not end up in the state your real work uses. See Start Here.
Step 1 — Declare the state model
software/gui/backend/backend/modules/demoD_controller.py:
class DemoDState(ModuleState):
    """One voltage channel plus a trim voltage set by a slider."""

    module_type: Literal["demoD"] = "demoD"
    core: Core
    vsource: IVsourceAddon
    trim_voltage: float = 0.0
Three things are happening.
module_type must be a Literal. Module states are stored in a list whose type is a tagged union, and module_type is the tag that tells Pydantic which model a slot is. Give it anything else and build_system_state_model() raises a TypeError naming your class.
vsource: IVsourceAddon opts into an addon — a state shape the frontend already has components for. A module that declares vsource gets the digit display, the increment buttons and the on/off button for free. IVsenseAddon (readings) and PollingState (continuous sampling) are the other two.
trim_voltage: float = 0.0 is the other extreme: a plain field on the module itself, at path /data/<slot>/trim_voltage. This is what the slider will drive, and it is the simplest thing a module can own.
Where should the model live? Real modules put theirs in
software/client/dbay/state.pyand add it toBUILTIN_MODULE_STATES, so the Python client validates the module too. demoD keeps its model beside its controller instead, to stay out of the publisheddbaypackage. That works because the registry is a plugin point — the backend buildsSystemStatefrom whatever it has registered. The cost is that a Python client sees a demoD slot asUnknownModuleState: it round-trips the data but offers no typed access. For real hardware, put the model in the client package.
Step 2 — Write the controller
The controller is the only part that talks to hardware. Same file:
def create_prototype(slot: int) -> DemoDState:
    """What a freshly added demoD looks like before anything touches it."""
    channels = [ChSourceState(index=0, bias_voltage=0.0, activated=False,
                              heading_text="", measuring=False)]
    return DemoDState(
        core=Core(slot=slot, type="demoD", name="my demoD module"),
        vsource=IVsourceAddon(channels=channels),
        trim_voltage=0.0,
    )


class demoDController(Controller):
    def __init__(self, parent_udp: ParentUDP, module_slot: int):
        super().__init__(parent_udp, "DAC4D")
        self.module_slot = module_slot
        self._module = dbay_client.attach_module(module_slot, ClientDac4D)
        self.setDevice(self.module_slot)

    def set_output_voltage(self, voltage: float) -> int:
        return self._send(OUTPUT_CHANNEL, voltage)   # channel 0

    def set_trim_voltage(self, voltage: float) -> int:
        return self._send(TRIM_CHANNEL, voltage)     # channel 1

    def _send(self, channel: int, voltage: float) -> int:
        try:
            self._module.set_voltage(channel, voltage)
        except Exception as exc:
            logger.error("demoD set_voltage failed: %s", exc)
            return -1
        return 0
create_prototype defines a freshly added module. Note core.type is the same string as module_type — the backend discriminates on one and the frontend dispatches on the other, and they must agree.
The controller does not build UDP strings. dbay_client.attach_module(slot, ClientDac4D) hands back the client package’s dac4D wrapper, already bound to the backend’s UDP connection, and set_voltage sends the DAC4D VSD command. The trim is not a new protocol — it is the same command on hardware channel 1. Reusing the client package this way means the wire format lives in exactly one place, and a Python script driving the rack directly speaks the same commands as the GUI.
Controllers return status codes rather than raising — 0 for success, -1 for failure. The command handler turns a non-zero result into a user-visible error, which keeps hardware plumbing free of presentation concerns.
Step 3 — Register the module
backend/module_registry.py:
"demoD": ModuleRegistration(
    model_class=DemoDState,
    create_prototype=create_demoD,
    controller_class=demoDController,
),
This one dictionary is how the backend learns the type exists. From here:
initialize_modulecan create it, becauseadd_modulelooks the type up herebackend/state.pyrebuildsSystemStatefrom the registered models, so the new shape validates and persists- a type not in the registry still validates, as
UnknownModuleState— that is why an older client can read a rack containing modules it has never heard of
Skip this step and the module can never be added to a slot.
Step 4 — Write the commands
backend/modules/demoD.py holds the write path. Start with a helper, because every command needs the same check:
def _demod_at(module_index: int) -> DemoDState:
    try:
        module = global_state.system_state.data[module_index]
    except IndexError as exc:
        raise _command_error("invalid_module",
                             f"Slot {module_index + 1} is outside the rack.",
                             path=ptr("data", module_index)) from exc

    if module.core.type != "demoD":
        raise _command_error("invalid_module",
                             f"Slot {module_index + 1} is not a demoD module.",
                             path=ptr("data", module_index))
    return cast(DemoDState, module)
Then the trim command — the whole shape of a write, in fifteen lines:
class TrimChange(BaseModel):
    module_index: int
    voltage: float


@sync.command
def set_demod_trim(ctx: CommandContext, **params):
    change = TrimChange(**params)          # 1. parse
    module = _demod_at(change.module_index)

    voltage = round(change.voltage, 3)     # 2. validate
    if voltage < TRIM_MIN or voltage > TRIM_MAX:
        raise _command_error(
            "trim_out_of_range",
            f"{voltage} V is outside the trim range ({TRIM_MIN} V to {TRIM_MAX} V).",
            display="inline",
            path=ptr("data", change.module_index, "trim_voltage"),
        )

    controller = cast(demoDController, global_state.controllers[change.module_index])
    if controller.set_trim_voltage(voltage) != 0:   # 3. touch hardware
        raise _command_error("hardware_command_failed",
                             "The demoD trim command failed.",
                             display="banner", severity="error",
                             path=ptr("data", change.module_index, "trim_voltage"))

    module.trim_voltage = voltage          # 4. commit — this is the broadcast
    return {"module_index": change.module_index, "voltage": voltage}
The order of those four steps is the whole design. Parse, validate, drive the hardware, and only then mutate the state. That last line is not bookkeeping: mutating the bound model is what sends replace /data/5/trim_voltage to every connected client, including the one that sent the command. The return value is only an acknowledgement for the caller.
If validation fails, nothing was mutated, so no client ever saw a value the hardware refused. That is why the state cannot drift from the instrument.
Errors carry a location
display="inline" with a path means “show this next to that field”. The frontend files inline errors by JSON pointer, so the slider can render its own error message without any error-passing plumbing. Use "toast" for something transient, "banner" for something serious enough to sit at the top of the app.
The vsource command is the same pattern with the addon’s shape — see the full file — and it demonstrates one extra convention: an output whose activated is false stores its setpoint but drives zero volts.
hardware_voltage = change.bias_voltage if change.activated else 0The gotcha: import the file
backend/main.py:
from backend.modules import demoD as _demoD_commands # noqa: F401Decorators only run when the module is imported. Skip this and your handlers never register: the code looks correct, and every call fails with an unknown-command error at runtime.
Checkpoint — drive it before any UI exists
You now have a complete backend. Prove it without writing a line of frontend code. With the dev server running, save this as poke.ts and run bun poke.ts:
const ws = new WebSocket("ws://127.0.0.1:8345/sync/ws");

ws.onmessage = (event) => {
  const msg = JSON.parse(event.data as string);
  console.log(msg.type, JSON.stringify(msg.patch ?? msg.result ?? msg.code ?? ""));

  if (msg.type === "snapshot") {
    ws.send(JSON.stringify({ type: "command", command: "initialize_module",
                             requestId: "add", params: { slot: 5, type: "demoD" } }));
  }
  if (msg.type === "command_ack" && msg.requestId === "add") {
    ws.send(JSON.stringify({ type: "command", command: "set_demod_trim",
                             requestId: "trim", params: { module_index: 5, voltage: -0.35 } }));
  }
};
You should see the snapshot, then the patches your mutation produced:
replace /data/5 {"core":{"slot":5,"type":"demoD",...},"trim_voltage":0}
replace /data/5/trim_voltage -0.35
Sending voltage: 5.0 instead gets you the rejection, with the location attached:
command_error trim_out_of_range
  "5.0 V is outside the trim range (-1.0 V to 1.0 V)."
  path: /data/5/trim_voltage   display: inline
This is worth doing every time you add a module. If the patches look right here, every client is already correct, and anything that goes wrong from now on is a UI problem.
Step 5 — Mirror the state in the frontend
src/lib/modules_dbay/demoD_data.svelte.ts. This is the file that looks impenetrable, so here it is in pieces.
The class is a view of a path. SvelteSyncNode<JsonModule> takes a sync runtime and a path, and gives you a defineFields mechanism for applying patches:
export class demoD extends SvelteSyncNode<JsonModule> implements IModule {
  public core: CoreModule;
  public vsource: VsourceAddon;
  public trim_voltage: number = $state(0);
  public dragging = $state(false);
trim_voltage is $state, so the slider redraws when a patch changes it. dragging is local-only UI state that never leaves the browser — the class is allowed to hold that, it just holds no truth.
defineFields declares how incoming patches are applied. Fields you do not list are ignored:
  public fields: any = this.defineFields<any>({
    core:    { onApplied: () => this.replaceIfTypeChanged() },
    vsource: { onApplied: () => this.replaceIfTypeChanged() },
    trim_voltage: {
      blockWhen: () => this.dragging,
      onBlocked: "queueLatest",
      validateRemote: (value: unknown) => typeof value === "number",
      coerceRemote: (value: unknown) => Math.round(Number(value) * 1000) / 1000,
    },
});| Option | What it does |
|---|---|
blockWhen | While this returns true, incoming values are not applied |
onBlocked: "queueLatest" | Remember only the newest blocked value, apply it when unblocked |
validateRemote | Reject malformed incoming data instead of assigning it |
coerceRemote | Normalize an incoming value (here: round to millivolts) |
onApplied | Run after a value lands — used for follow-on updates |
writable: false | This field is never patched (e.g. a channel index) |
blockWhen deserves the attention. Without it, dragging the slider fights the server: you move the thumb, your debounced command arrives, the server echoes the value back, and the patch resets the thumb to where it was a moment ago. Blocking while dragging is true — and applying only the latest queued value afterwards — is why the control feels solid. The existing channel code does the same thing for bias_voltage while you are typing a value.
The constructor builds child paths from its own:
    const nodePath = path ?? joinJsonPointer("", "data", String(parsed.core.slot));
    super(sync, nodePath);                       // this module mirrors /data/<slot>
    this.core = new CoreModule(parsed.core);
    this.trim_voltage = parsed.trim_voltage ?? 0;
    this.vsource = new VsourceAddon(
      sync,
      joinJsonPointer(nodePath, "vsource"),      // the addon mirrors /data/<slot>/vsource
      parsed.core.slot,
      parsed.vsource?.channels,
      1,                                          // demoD has one channel
    );
The addon is a nested node with its own path, and each channel inside it has one too. That is how a patch to /data/5/vsource/channels/0/bias_voltage finds exactly one reactive variable to update.
Why two constructor signatures? The sync runtime calls the four-argument form. Tests and the offline fallback state construct a module from plain data with no runtime, which is the one-argument form. The overloads let both work.
The three lifecycle methods:
  public applySnapshot(data: JsonModule): void   // a whole-module replacement arrived
  public update(data: JsonModule): void          // copy fields from JSON into this view
  public dispose(): void                         // unsubscribe this node and its children
replaceSelf handles the case where a slot’s type changes — someone replaced the demoD with a dac16D. This class cannot represent that, so it hands the slot back to the registry to construct the right class. That is what replaceIfTypeChanged is for.
Step 6 — Build the module component
src/lib/modules_dbay/demoD.svelte. A .svelte file has three parts: a <script> block (component logic), markup, and scoped <style> that applies only to this component.
<script lang="ts">
  interface MyProps { module_index: number; }
  let { module_index }: MyProps = $props();

  const this_component_data = system_state.data[module_index] as demoD;
</script>
$props() receives what the parent passed. Every module component takes exactly one prop, module_index, and looks its own state up in system_state.data — so the component is a thin renderer of the mirror you built in step 5.
Reusing the channel UI is two lines of markup:
<Channel
  ch={this_component_data.vsource.channels[0]}
  {module_index}
  {down}
  onChevronClick={() => (down = !down)}
  {onChannelChange}
  borders={false}
/>
borders={false} is worth noting. A Channel normally draws its own left, right and bottom edges, which is right when channels are stacked — but demoD’s channel is followed by the trim row, and that bottom edge would cut the module in half visually. With it off, demoD.svelte draws the side edges on both rows and the bottom edge only on the last one, so the two controls read as one surface.
Channel composes ChannelBar and ChannelContent, which in turn use Display (the four-digit voltage readout), the chevron increment buttons and the on/off button. You get all of it by handing over one channel object. onChannelChange is the hook where you say which command this module’s channel sends:
async function onChannelChange(data: VsourceChange) {
  if (!system_state.valid) return data;      // offline fallback: echo it back
  return await requestDemodVsource(data);
}
That system_state.valid check is a convention worth copying: when the backend is unreachable the app shows a fallback state, and echoing the change keeps the UI usable instead of dead.
ModuleHeading gives you the module’s title bar, rename field, icon and collapse chevron. Notice what it is not given:
<ModuleHeading m={this_component_data} {visible} {rotateState} {module_index} {menu_buttons} />No title and no icon. It looks both up in the module catalog using m.core.type, so they are declared once (step 8) instead of being restated by every component. Both remain available as props if a module ever needs to override them.
The visible state stored in localStorage is how every module remembers whether it was collapsed:
let visible = $state(
  Number(localStorage.getItem("visible" + module_index)) || VisibleState.DoubleDown,
);
Step 7 — Build the slider
Nothing in the codebase draws a slider, so src/lib/Slider.svelte is a new, reusable building block. Two problems to solve.
Native range inputs cannot be styled portably. The track and thumb are separate pseudo-elements with different names per engine, so each rule is written twice (::-webkit-slider-runnable-track and ::-moz-range-track). The filled portion of the track is a hard-stop gradient driven by a CSS variable, which avoids needing a second element behind the input:
<input type="range" style="--fill: {fraction}%" ... />

<style>
  input[type="range"]::-webkit-slider-runnable-track {
    background: linear-gradient(to right,
      var(--edit-blue) var(--fill), var(--value-border-color) var(--fill));
  }
</style>
Use the app’s design tokens (--edit-blue, --display-color, --outer-branch-color, and friends from src/app.css) rather than literal colours, so the control follows the theme.
A slider has two distinct moments, and the component exposes both:
interface Props {
  value: number;
  min?: number; max?: number; step?: number;
  oninput?: (value: number) => void;    // continuously, while dragging
  onrelease?: (value: number) => void;  // once, when the user lets go
}
Debouncing the commands
A drag across the track fires oninput dozens of times. Sending a command per pixel would flood the backend and the hardware. In demoD.svelte:
const DEBOUNCE_MS = 120;
let debounceTimer: ReturnType<typeof setTimeout> | undefined;

function onTrimInput(voltage: number) {
  // Move the thumb now — waiting for the server would feel laggy.
  this_component_data.dragging = true;
  this_component_data.trim_voltage = voltage;

  clearTimeout(debounceTimer);
  debounceTimer = setTimeout(() => sendTrim(voltage), DEBOUNCE_MS);
}

function onTrimRelease(voltage: number) {
  // Cancel the pending timer and send immediately, so the hardware's last
  // value is exactly where the thumb stopped.
  clearTimeout(debounceTimer);
  this_component_data.dragging = false;
  this_component_data.trim_voltage = voltage;
  sendTrim(voltage);
}
Three things are cooperating here:
- Optimistic local update. The thumb follows your finger because the local mirror is assigned immediately, before any command is sent.
dragginggates incoming patches via theblockWhenfrom step 5, so the server’s echo cannot yank the thumb mid-drag.- Release is not just “the last debounce”. Cancelling the timer and sending straight away guarantees the final position reaches the hardware even if the user releases within the debounce window.
120 ms is a deliberate compromise: a full-track drag sends a handful of commands rather than a hundred, and the delay is short enough that the readout still feels live.
If the command fails, the mirror is resynced from the runtime so the thumb cannot sit at a value the hardware rejected:
requestDemodTrim({ module_index, voltage }).catch(() => {
  this_component_data.trim_voltage =
    this_component_data.sync.get<{ trim_voltage?: number }>(
      this_component_data.path).trim_voltage ?? 0;
});
Showing the error where it happened
Because the backend attached a path, the component can pick its own error out of the error store:
const trimPath = joinJsonPointer("", "data", String(module_index), "trim_voltage");
let trimError = $derived(syncErrors.byPath.get(trimPath));{#if trimError}<span class="trim-error">{trimError.message}</span>{/if}Note that the slider itself cannot produce an out-of-range value — its min and max prevent it. The backend validates anyway, because a Python client or a second browser can send anything. Defending at the boundary rather than in the UI is the point.
Step 8 — Register the module in the frontend
Two edits, in two files. Everything else — the adder’s dropdown, the heading title, the icon in both places — is derived from them.
1. src/lib/modules_dbay/module_catalog.ts — how the module presents itself:
{
  // Not real hardware: the worked example in the Adding a Module guide. It has
  // no icon of its own, and dev_mode keeps it out of a normal install.
  type: "demoD",
  label: "demoD",                            // dropdown name
  title: "Demo Module",                      // heading title
  description: "tutorial module (dev only)",  // dropdown subtitle
  icon: UNKNOWN_MODULE_ICON,
  devOnly: true,
},
type must equal the backend’s core.type and module_type exactly. A real module supplies its own SVG from frontend/public/assets/ instead of the placeholder, and omits devOnly. addable: false exists for types a user cannot add — only empty uses it.
The catalog imports nothing, deliberately: ModuleHeading reads it, and ModuleHeading is imported by the module components, so any import here would risk a cycle.
2. src/lib/modules_dbay/index.svelte.ts — the code bound to the type:
export const MODULE_BINDINGS: Record<string, ModuleBinding> = {
  empty: { data: empty },
  dac4D: { data: dac4D, component: dac4D_component },
  ...
  demoD: { data: demoD, component: demoD_component },
};
data is the class that mirrors the state (step 5); component is what draws it (step 6). The modules and cc lookup tables used by the rest of the app are derived from this, so there is nothing else to update.
Why two lists, and what stops them drifting
Presentation has to be reachable from ModuleHeading without importing components; bindings by definition import components. So they cannot be the same file — but they must describe the same set of types, and assertRegistryMatchesCatalog() checks exactly that at load, logging a specific error:
[module registry] "demoD" is in MODULE_BINDINGS but missing from module_catalog.ts,
so it has no title, icon, or entry in the module adder.
src/tests/module_registry.test.ts runs the same check, so drift fails bun run test rather than waiting for someone to pick a broken dropdown entry. It also pins the adder’s filtering: empty is never offered, and demoD appears only when the backend reports dev_mode.
Skip either edit and you get a named error the first time the app loads, and a failing test.
3. Two smaller edits for a module with new state or commands. src/state/systemState.svelte.ts needs the field on the JSON shape:
export interface JsonModule {
  core: JsonCoreModule;
  vsource?: IVsourceAddon;
  trim_voltage?: number;   // demoD only
}
And src/api.ts needs one function per command:
export function requestDemodTrim(dst: DemodTrimChange): Promise<DemodTrimChange> {
  return sendCommand<DemodTrimChange>("set_demod_trim", { ...dst });
}
Step 9 — Add it and watch it work
The dev server has already reloaded both halves. Open http://localhost:5173, open the menu, and choose Add a module:
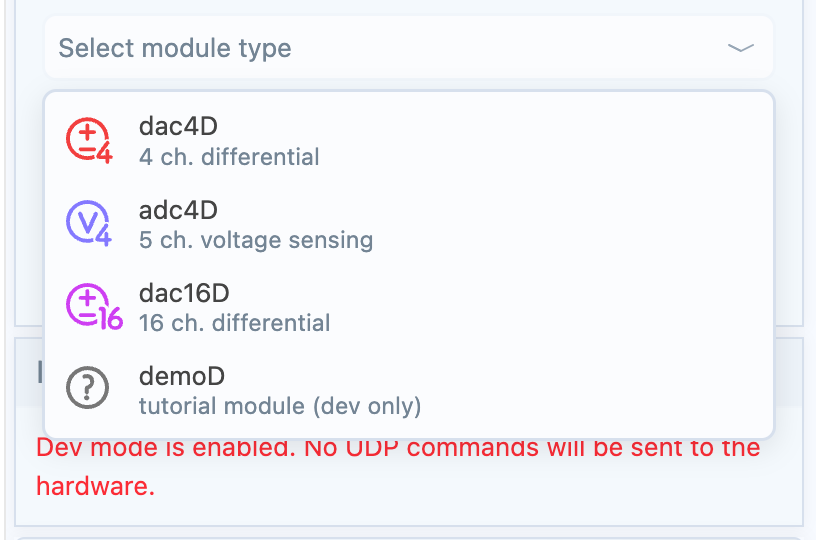
Pick a slot, pick demoD, and add it:
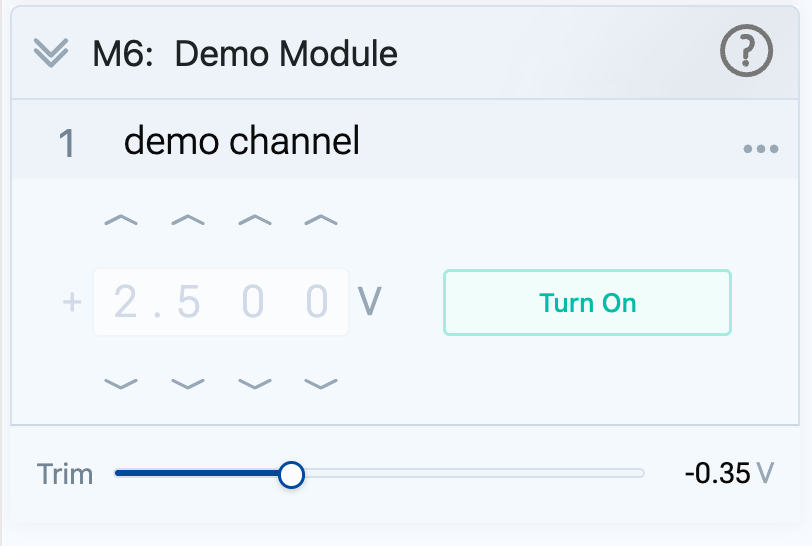
The upper half is the channel you did not write: type a voltage, use the chevrons, turn the output on. The lower half is your slider. Drag it and watch the readout follow immediately while the backend log shows commands arriving in bursts rather than continuously:
INFO demoD slot=5 channel=1 voltage=-0.35Open a second browser tab side by side. Move the slider in one and watch it move in the other — you did not write any code for that. It falls out of mutating the bound state in the command handler.
Step 10 — Pin the behaviour with a test
software/gui/backend/tests/test_demod.py covers each claim this guide makes: the registry produces a prototype, both commands mutate shared state, the mutation is broadcast as a patch at the expected path, out-of-range input is rejected without changing state, and a command aimed at the wrong module type is refused.
The pattern to copy — a websocket, a snapshot, then commands:
@pytest.fixture
def demod_slot():
    with TestClient(app) as client:
        with client.websocket_connect("/sync/ws") as websocket:
            websocket.receive_json()  # snapshot
            send_command(websocket, "initialize_module", {"slot": SLOT, "type": "demoD"})
    return SLOT


def test_trim_change_is_broadcast_as_a_patch(demod_slot):
    ...
    assert any(op["path"] == f"/data/{demod_slot}/trim_voltage" and op["value"] == -0.5
               for op in operations)
No hardware and no running server: conftest.py disables persistence, and dev_mode means UDP commands are acknowledged locally.
cd software/gui/backend && uv run pytest
cd software/gui/frontend && bun run test
Frontend integration tests construct a module class from plain data — the one-argument constructor form — and assert on its fields; src/tests/adc4D.integration.test.ts is the model to copy.
Checklist
For when you have done this before and just need the sequence:
- state model with a
Literalmodule_type(indbay/state.py+BUILTIN_MODULE_STATESfor real hardware) -
create_prototypeand a controller inbackend/modules/<name>_controller.py, delegating to a client-package module - entry in
backend/module_registry.py -
@sync.commandhandlers inbackend/modules/<name>.py, validate → hardware → mutate - import that file in
backend/main.py - poke it over the websocket before writing any UI
- mirror class in
src/lib/modules_dbay/<name>_data.svelte.ts - component
<name>.svelte, reusingChannel/SenseRowwhere the shape fits - entry in
module_catalog.ts(label, title, description, icon) and inMODULE_BINDINGS - field on
JsonModuleand a function inapi.ts, for new state or commands -
core.type,module_type, and the catalog’stypeidentical everywhere - a backend test that pins the commands and their validation
If you want demoD gone
Backend: delete backend/modules/demoD.py, backend/modules/demoD_controller.py, tests/test_demod.py, the module_registry.py entry and the main.py import. Frontend: delete demoD.svelte, demoD_data.svelte.ts, the module_catalog.ts entry, the MODULE_BINDINGS entry, the api.ts functions, trim_voltage on JsonModule, and the demoD expectation in module_registry.test.ts. Slider.svelte is worth keeping — it is a general control.
Documenting a real module for users belongs in the Modules and Rack section rather than here.